An axonometric drawing shows a building from above and at an angle, with every parallel line kept parallel and every dimension measurable. It sits between the plan and the perspective: you get the roof, two walls and the floor plan in one image, without any vanishing points. That is why juries often spend longest on the axo.
Most of the styles below come down to two decisions: what you cut away, and what you put back in. People, trees and furniture make an axonometric feel lived in, and our free architectural cutouts give you ready-made figures and planting to drop in. Below are 15 axonometric drawing styles, each tied to a real published project or historic drawing, with notes on how to recreate the look. If you are building a full set, this guide sits alongside our posts on architectural section drawing styles, elevation drawing styles and floor plan graphic styles.
1. The Exploded Axonometric
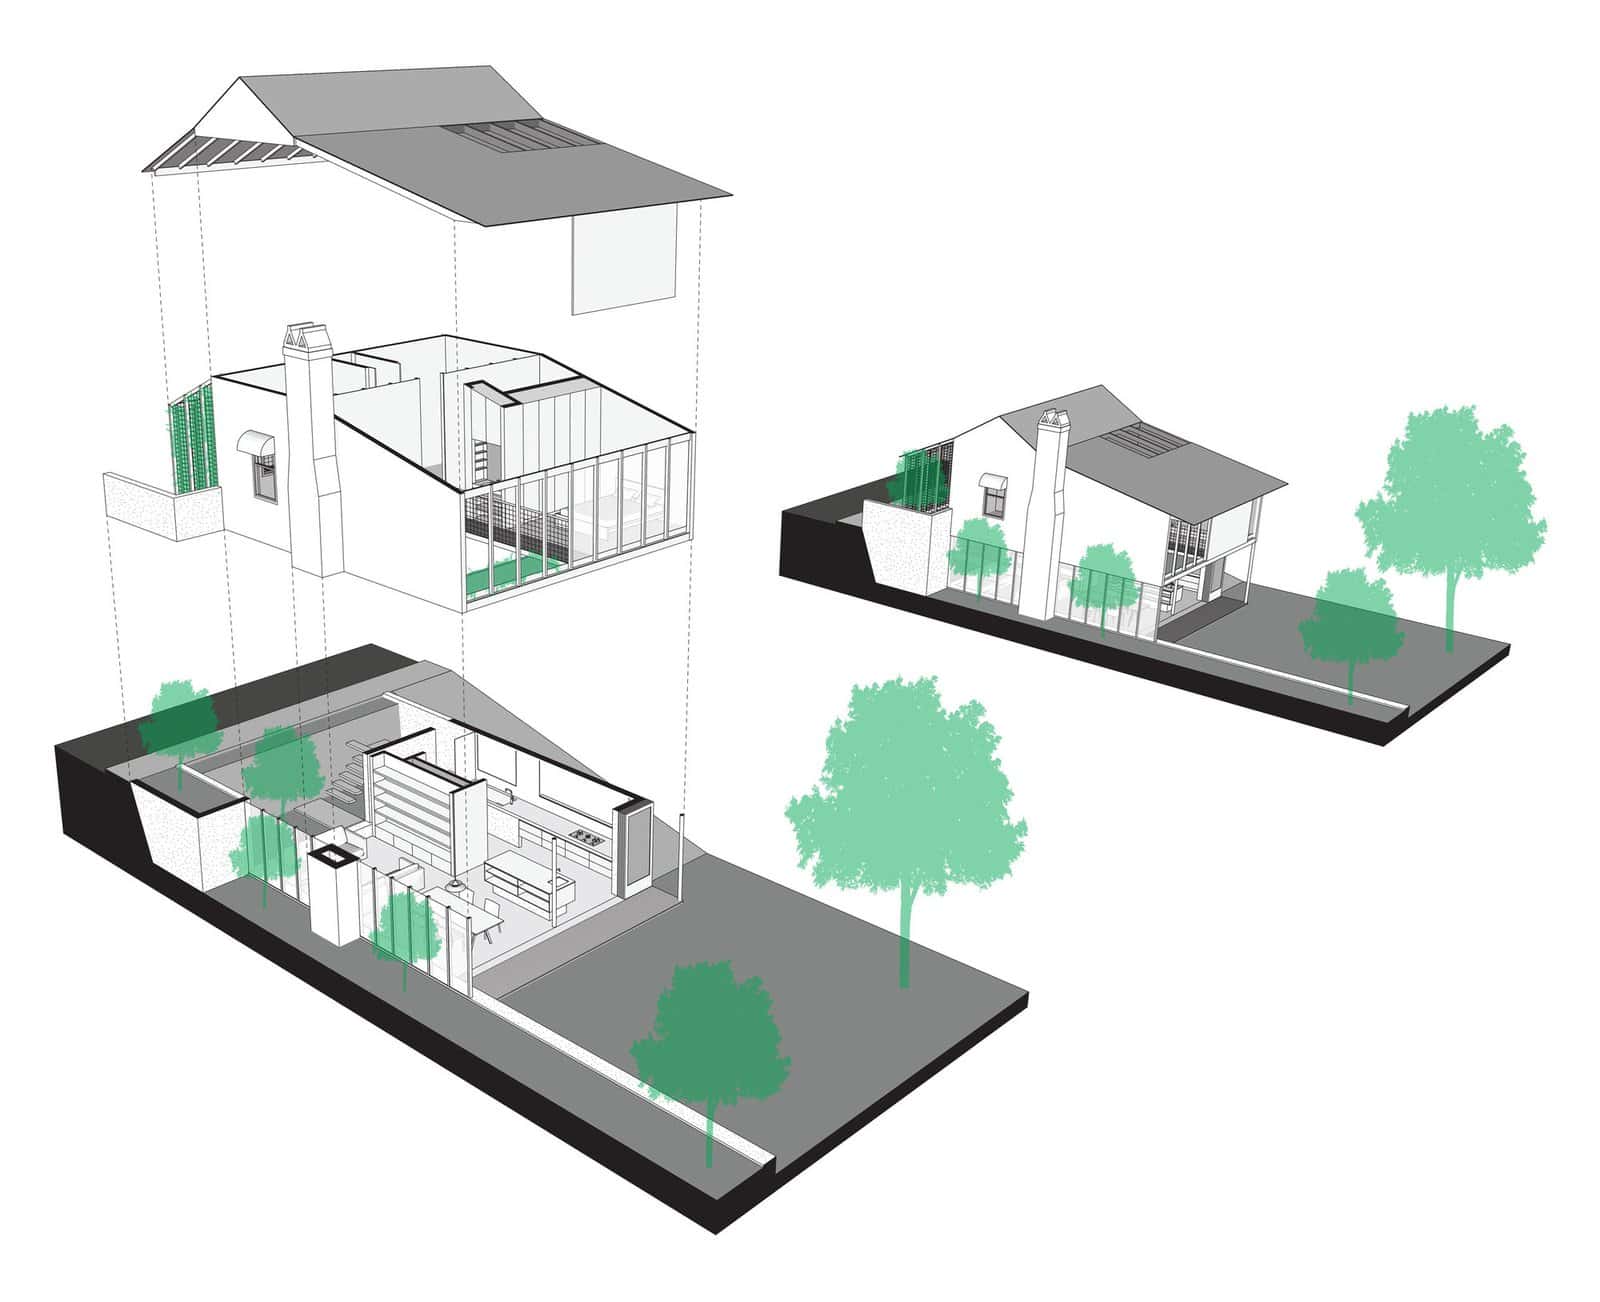
John Ellway’s Terrarium House in Brisbane, completed in 2017, reworks a 100-year-old cottage that was crumbling into a backyard jungle. His exploded axonometric lifts the roof and upper rooms clear of the ground floor, joins them with thin dashed lines, and parks a small assembled view of the house beside the stack so you never lose track of the whole. Flat mint-green trees and a heavy black ground slab keep it bright and graphic.
How to recreate it
- Explode along one axis only (usually vertical) and keep the gaps between layers equal.
- Join each layer to the one below with dashed guide lines at the corners.
- Add a small assembled view nearby so the reader can see how the pieces fit back together.
2. The Sectional (Cut) Axonometric
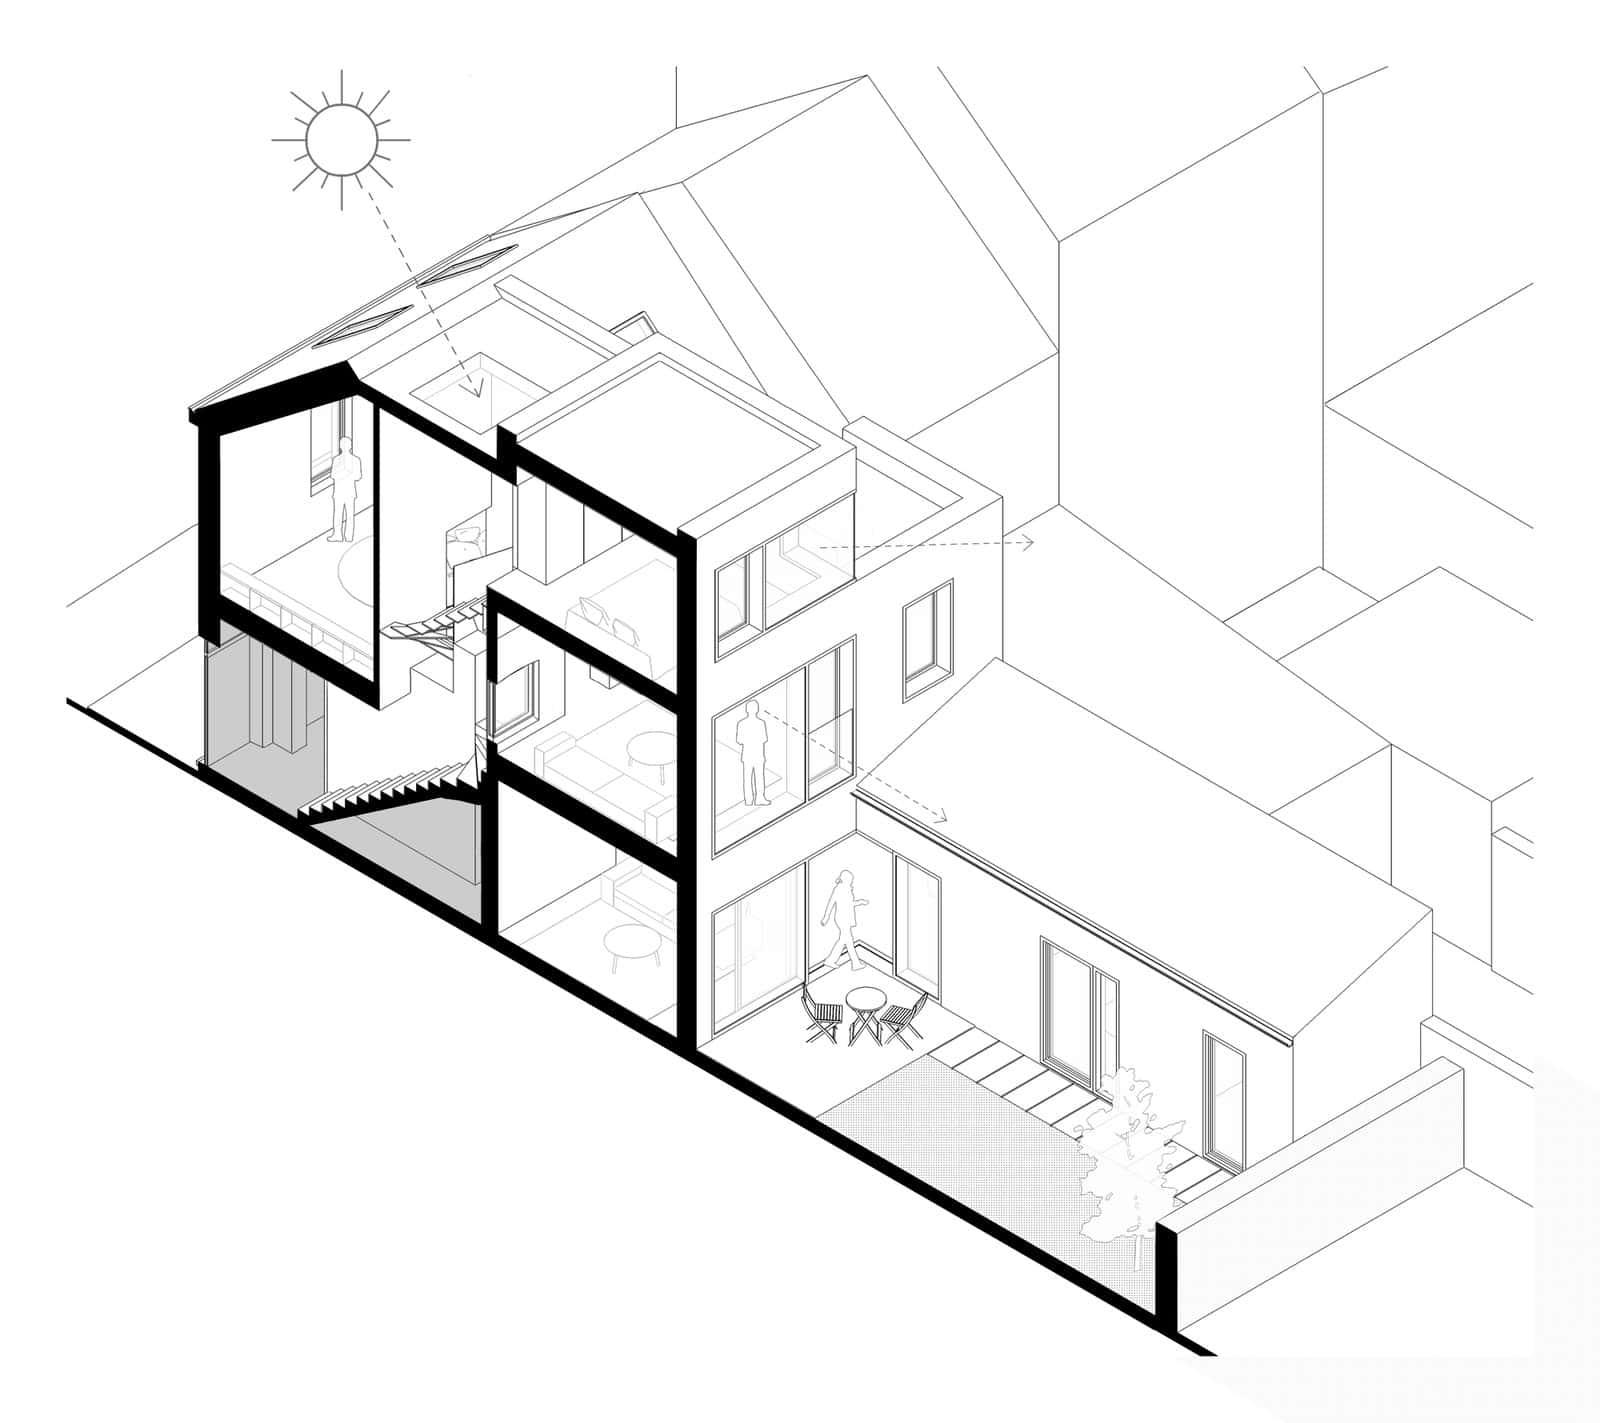
Edouard Brunet’s KOW House, a 200 m² Brussels terrace renovated in 2020, splits one house into two flats for the owner and his mother. The sectional axo slices straight through the party wall, fills every cut wall and slab in solid black, and lets the neighbouring houses fade into thin outline. A sun symbol with dashed arrows shows daylight dropping through the new roof lights, while a few figures and a courtyard table make the levels easy to read.
How to recreate it
- Cut on a plane that passes through the stair and the most interesting rooms.
- Fill everything that is cut in solid black or dark grey; leave uncut surfaces white.
- Use dashed arrows sparingly to explain light or air movement.
3. The Inhabited Axonometric
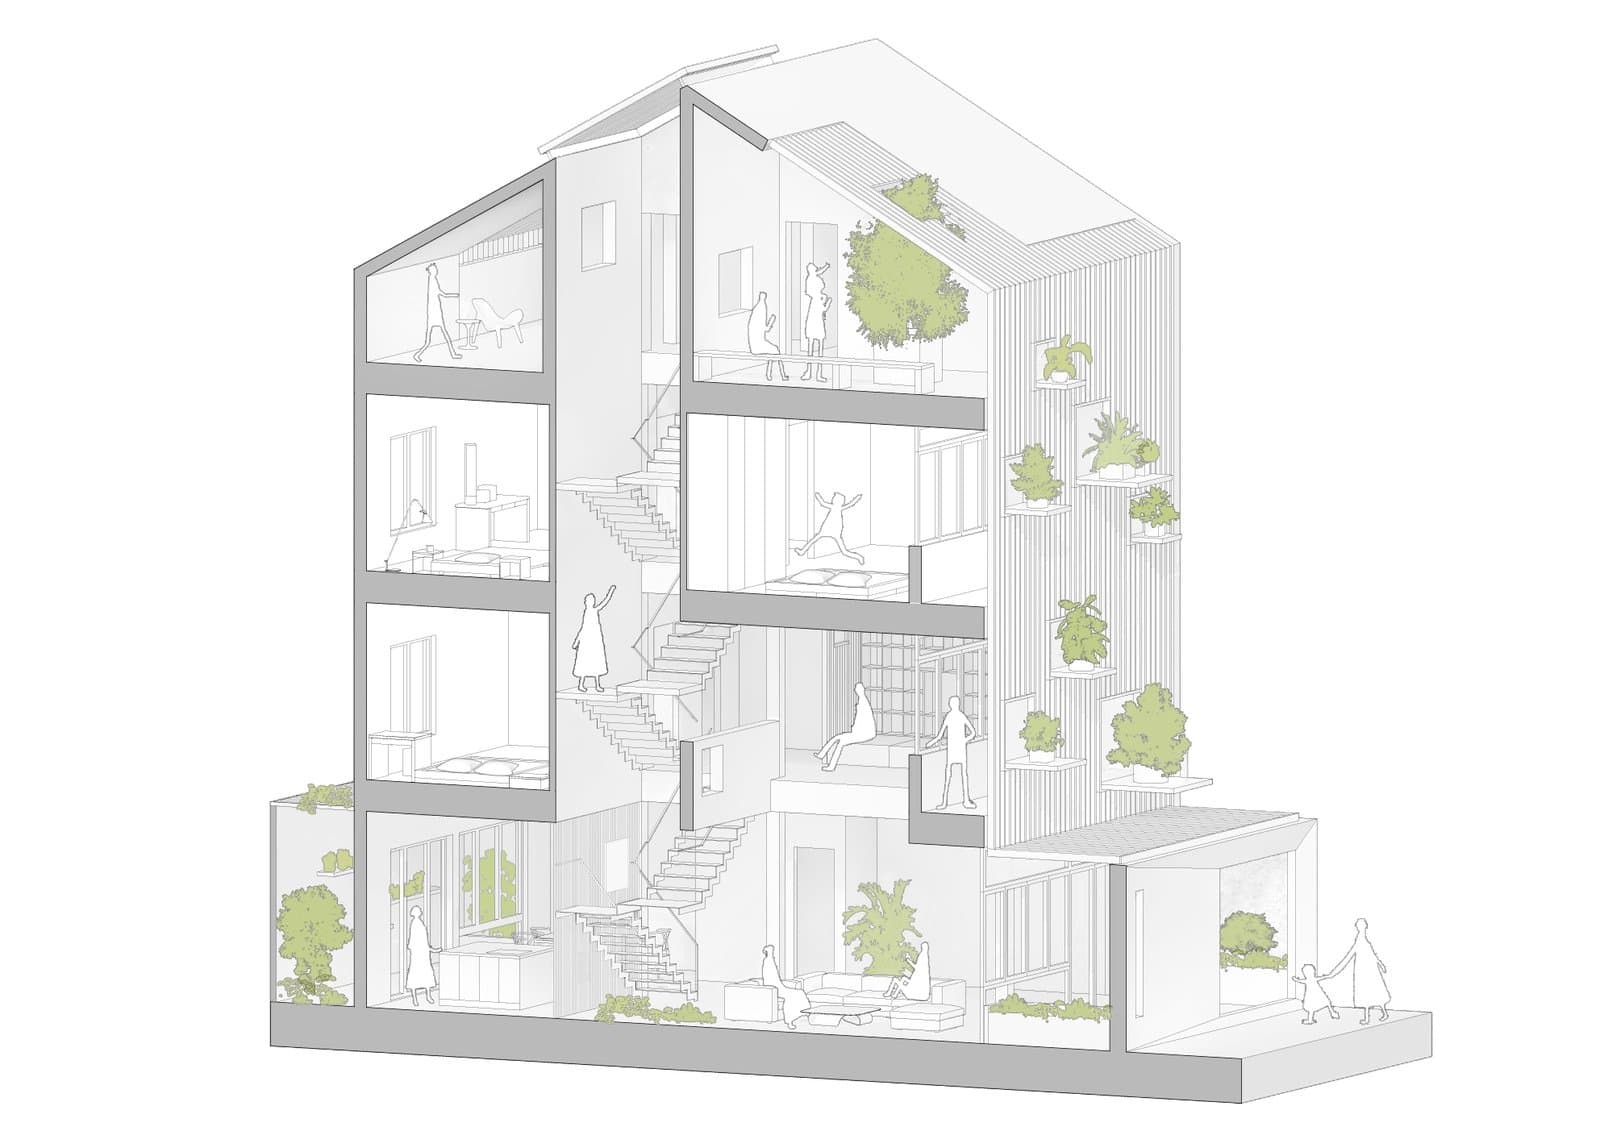
TH House by DANstudio, completed in 2017 on the outskirts of Hanoi, finishes a developer-built concrete skeleton that suffered from poor light and ventilation. The cutaway axonometric removes the front wall and fills every floor with life: a child jumping on a bed, a figure reaching up the stair, people sitting on a ledge, a mother and child at the gate. Soft green plants spill from the slatted facade, and everything else stays in pale grey.
How to recreate it
- Give every figure a task (reading, cooking, climbing) rather than just standing.
- Keep the architecture in light grey so people and plants become the focal points.
- Use one or two accent colours at most; here, green planting does all the work.
4. The Worm’s-Eye Axonometric
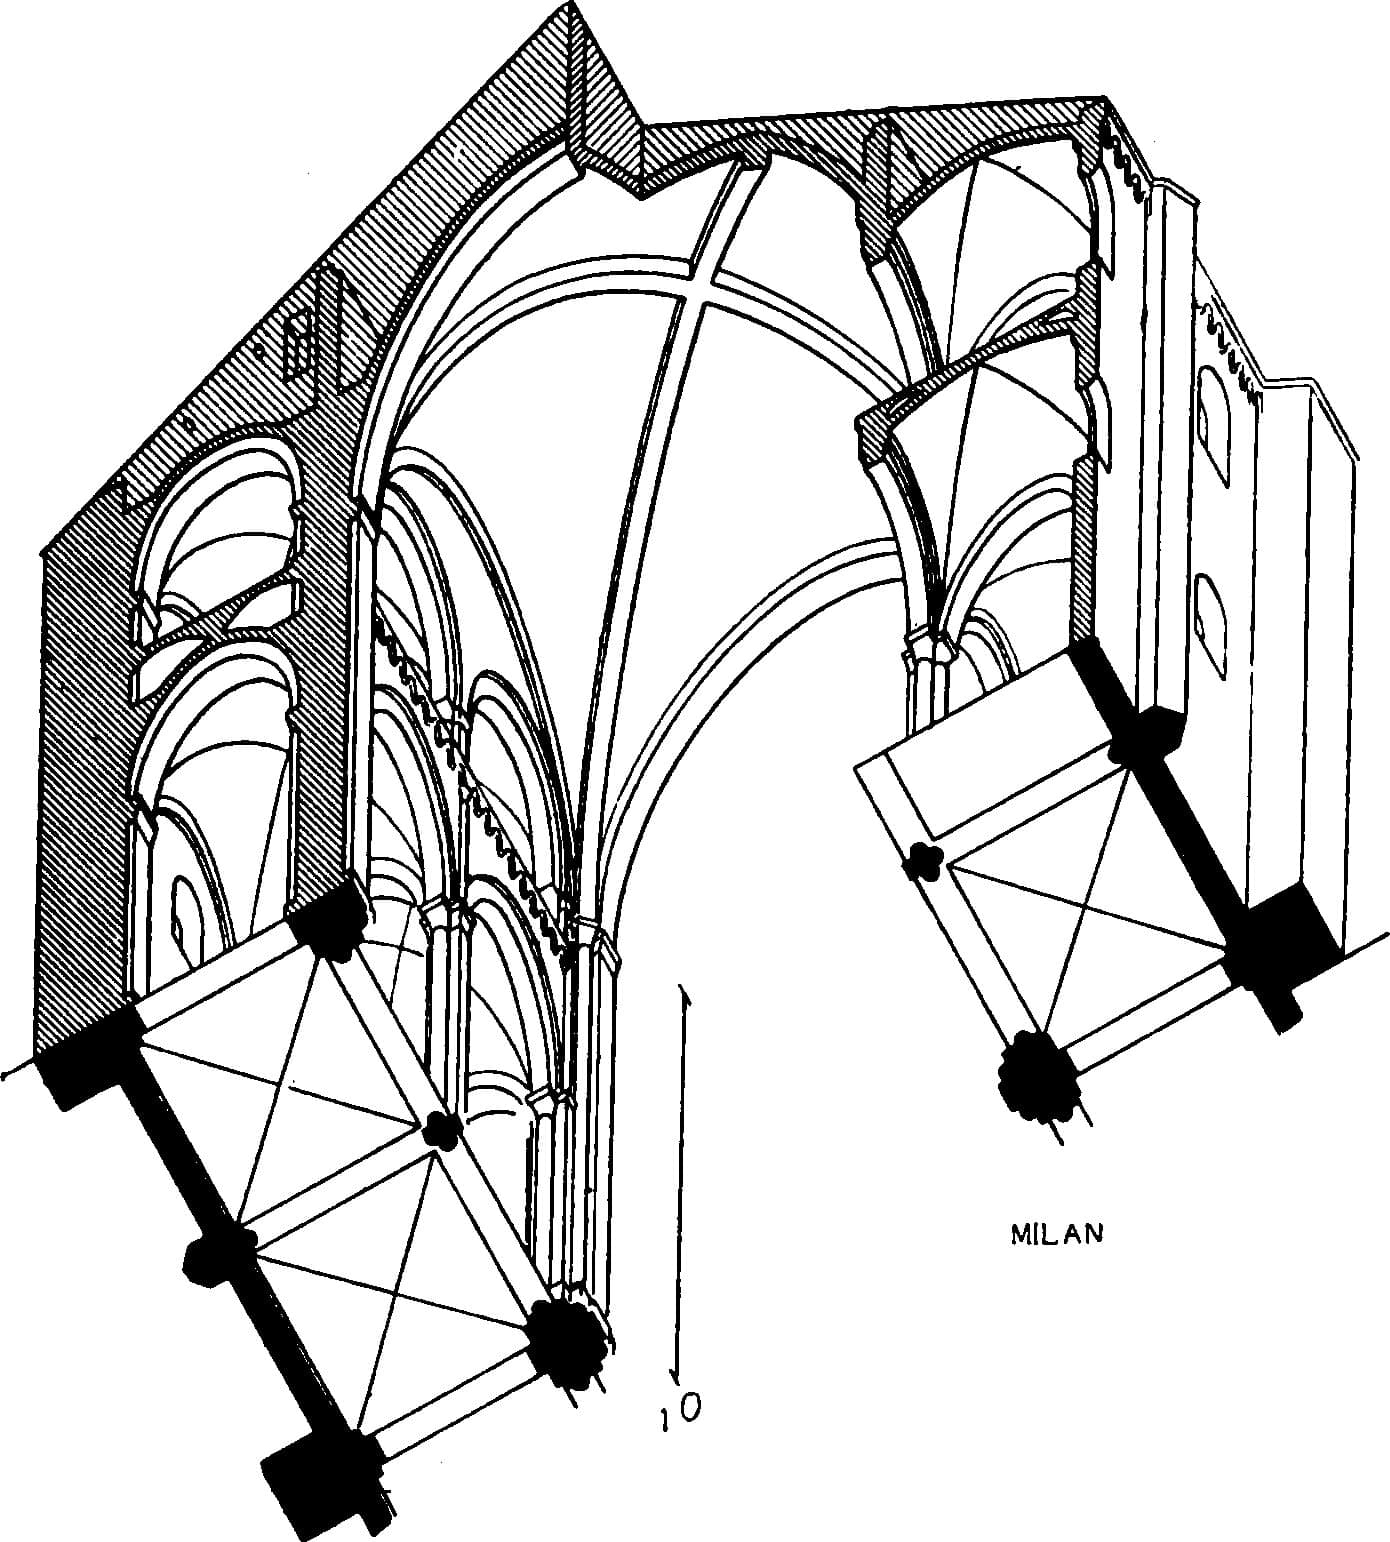
The French engineer Auguste Choisy drew hundreds of these up-views for his Histoire de l’architecture, published in 1899. In this one of the Basilica of Sant’Ambrogio in Milan, the plan sits at the bottom with its piers cut in solid black, and the walls and rib vaults rise away from you as if seen from the floor. Le Corbusier reproduced Choisy’s drawings in Towards a New Architecture, and the technique still explains vaults, soffits and ceilings better than any section.
How to recreate it
- Start from the plan and project the walls downward instead of upward.
- Show the cut piers or columns as solid black so the plan stays readable.
- Use it where the ceiling is the story: vaults, coffers, timber soffits or exposed structure.
5. The De Stijl Colour Axonometric
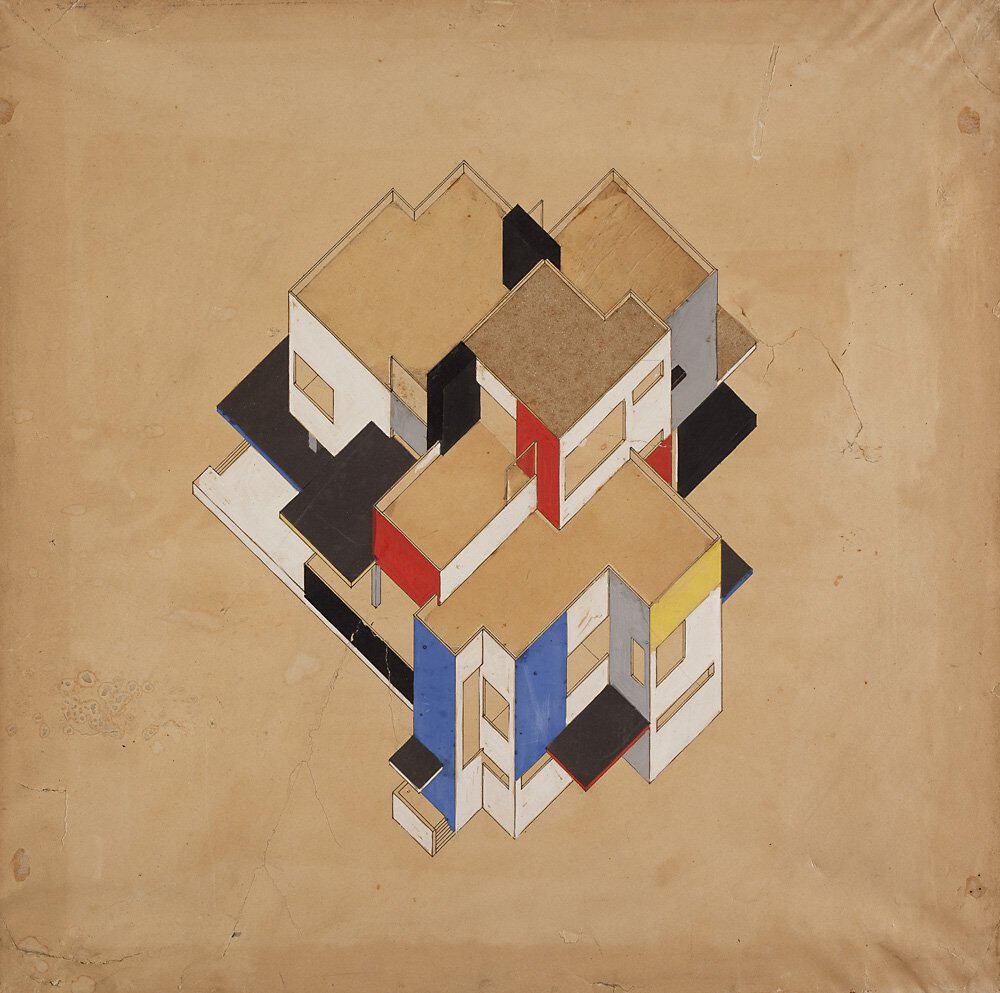
Theo van Doesburg and Cornelis van Eesteren drew the Maison Particulière for the 1923 De Stijl exhibition at Léonce Rosenberg’s Galerie L’Effort Moderne in Paris. In ink and gouache, the house becomes a cluster of floating planes in red, blue, yellow, grey and black, seen from high above with no single front. It helped turn the axonometric from a technical drawing into a design tool, and Het Nieuwe Instituut in Rotterdam holds the Maison Particulière drawings.
How to recreate it
- Treat each wall, floor and roof as a separate plane and give it one flat colour.
- Limit the palette to primaries plus black, grey and white.
- Rotate the drawing on the sheet so the building reads as an object, not a view.
6. The Line-Only Axonometric
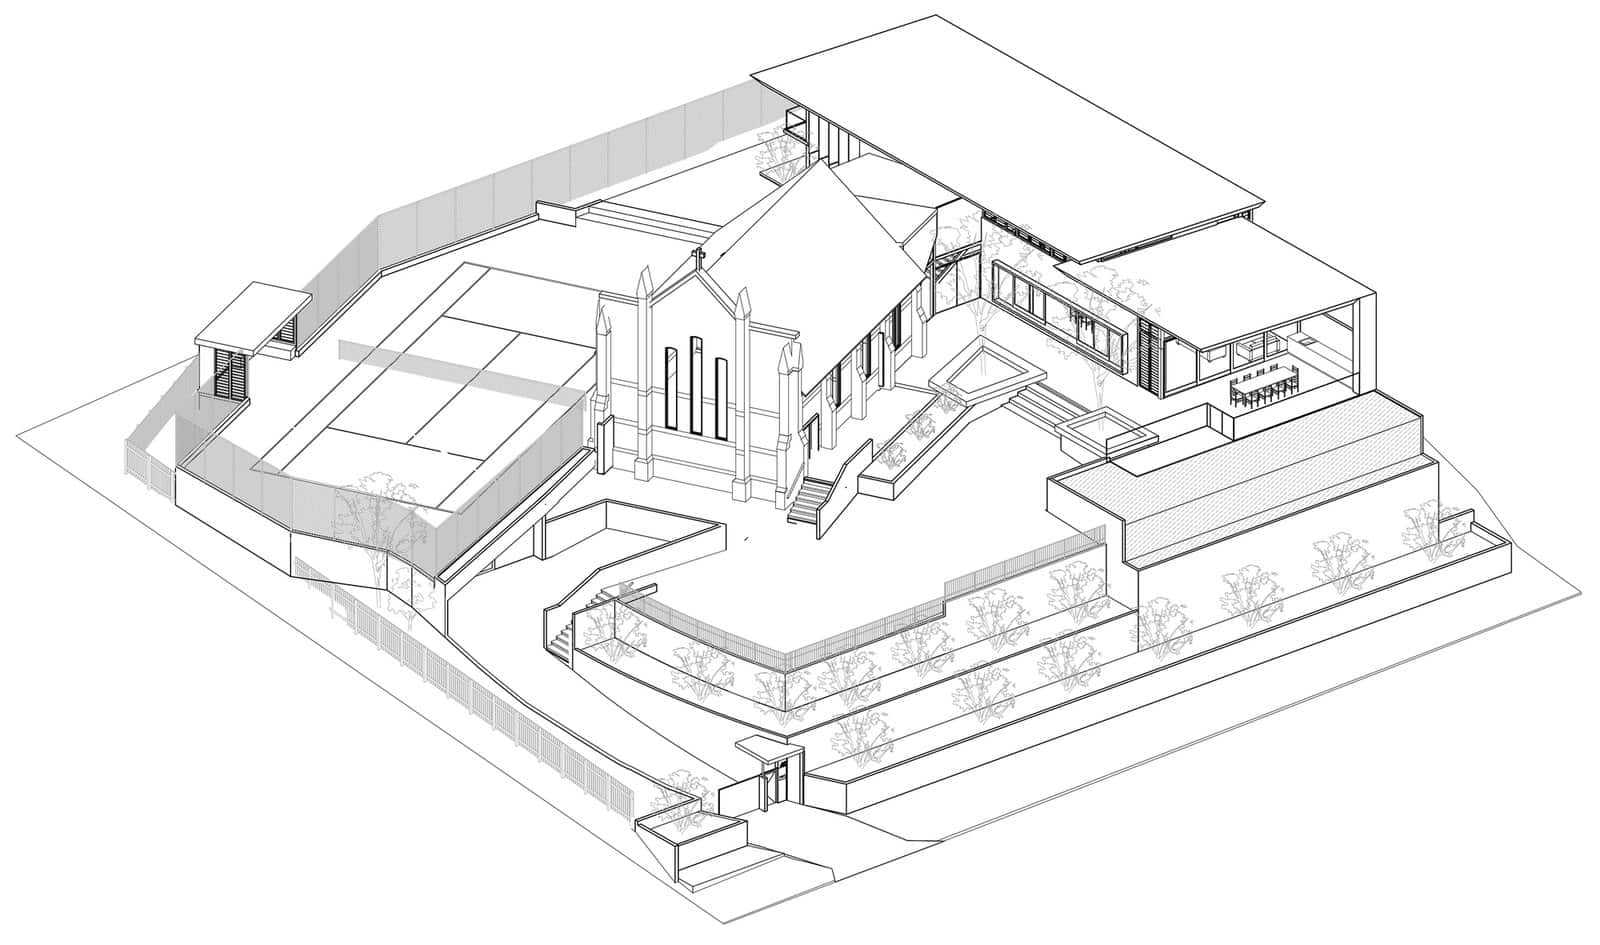
DAHA’s Church House in Norman Park, Brisbane, completed in 2017, turns the heritage-listed Church of the Transfiguration into a family home with a two-storey hillside extension. The axonometric uses nothing but black line: the old gabled church, the new flat-roofed wing, terraced retaining walls and a scatter of small outline shrubs. Line weight alone separates the buildings from the landscape.
How to recreate it
- Use a heavier line for outer edges and a hairline for joints, steps and planting.
- Draw planting as simple circles or scribbles so it never competes with the building.
- Leave out shadows and fills; let the white page carry the drawing.
7. The Colour-Blocked Axonometric
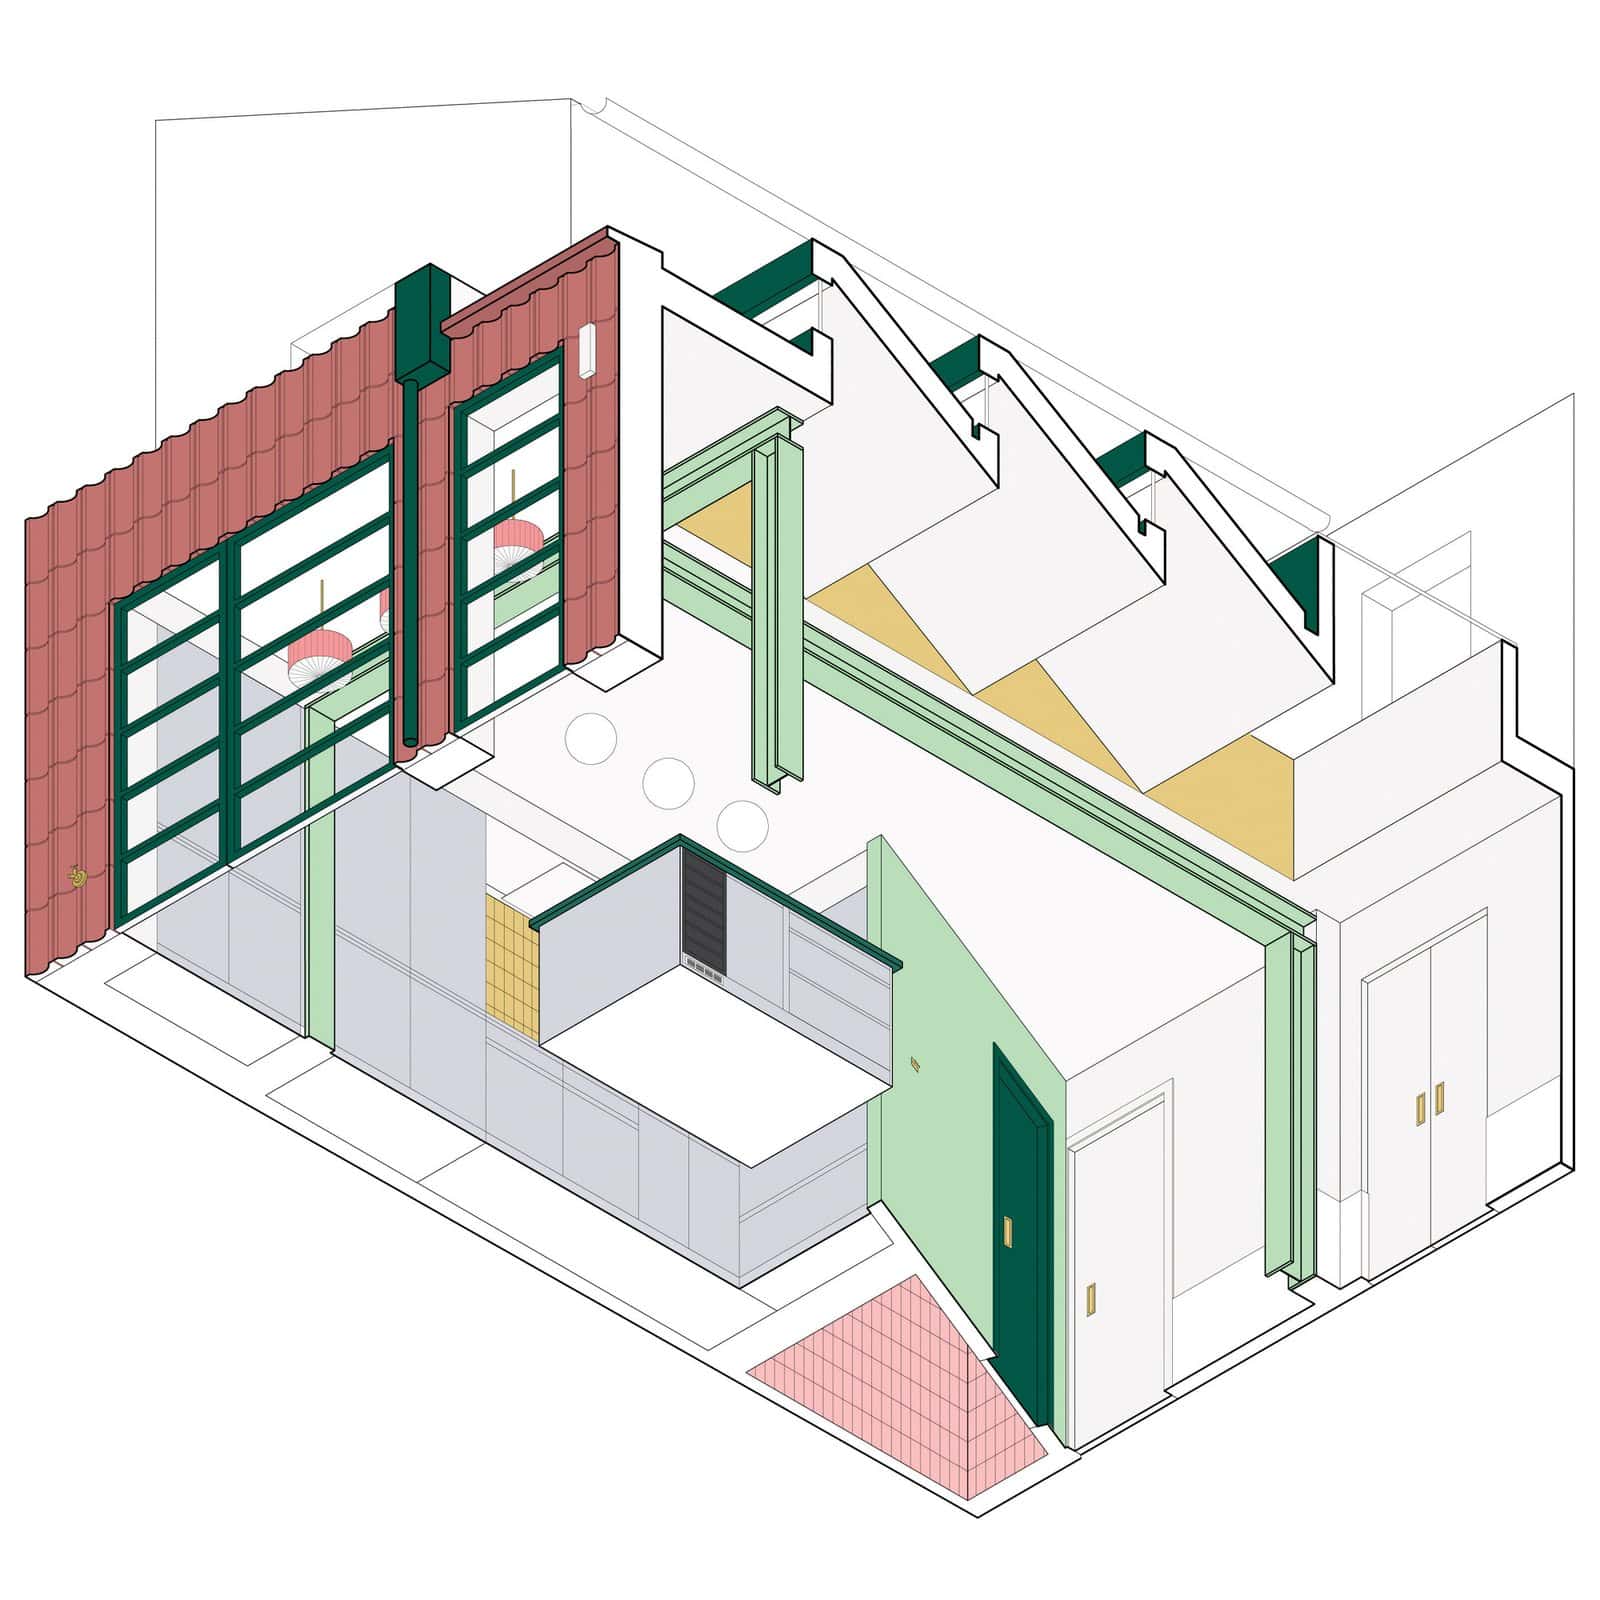
Office S&M’s Overcast House, completed in 2020, is a single-storey rear extension to a Victorian house in north London. The axonometric is pure flat colour: a terracotta scalloped wall, bottle-green window frames and doors, mint-green steel beams, sunflower-yellow planes between the sawtooth roof lights and pink floor tiles at the threshold. There is no rendering, yet every material is clear.
How to recreate it
- Pick one flat colour per material and use it everywhere that material appears.
- Keep outlines thin and black so the colours do not bleed into each other.
- Test the palette at thumbnail size; strong colour blocks should still read.
8. The Hand-Sketched Axonometric
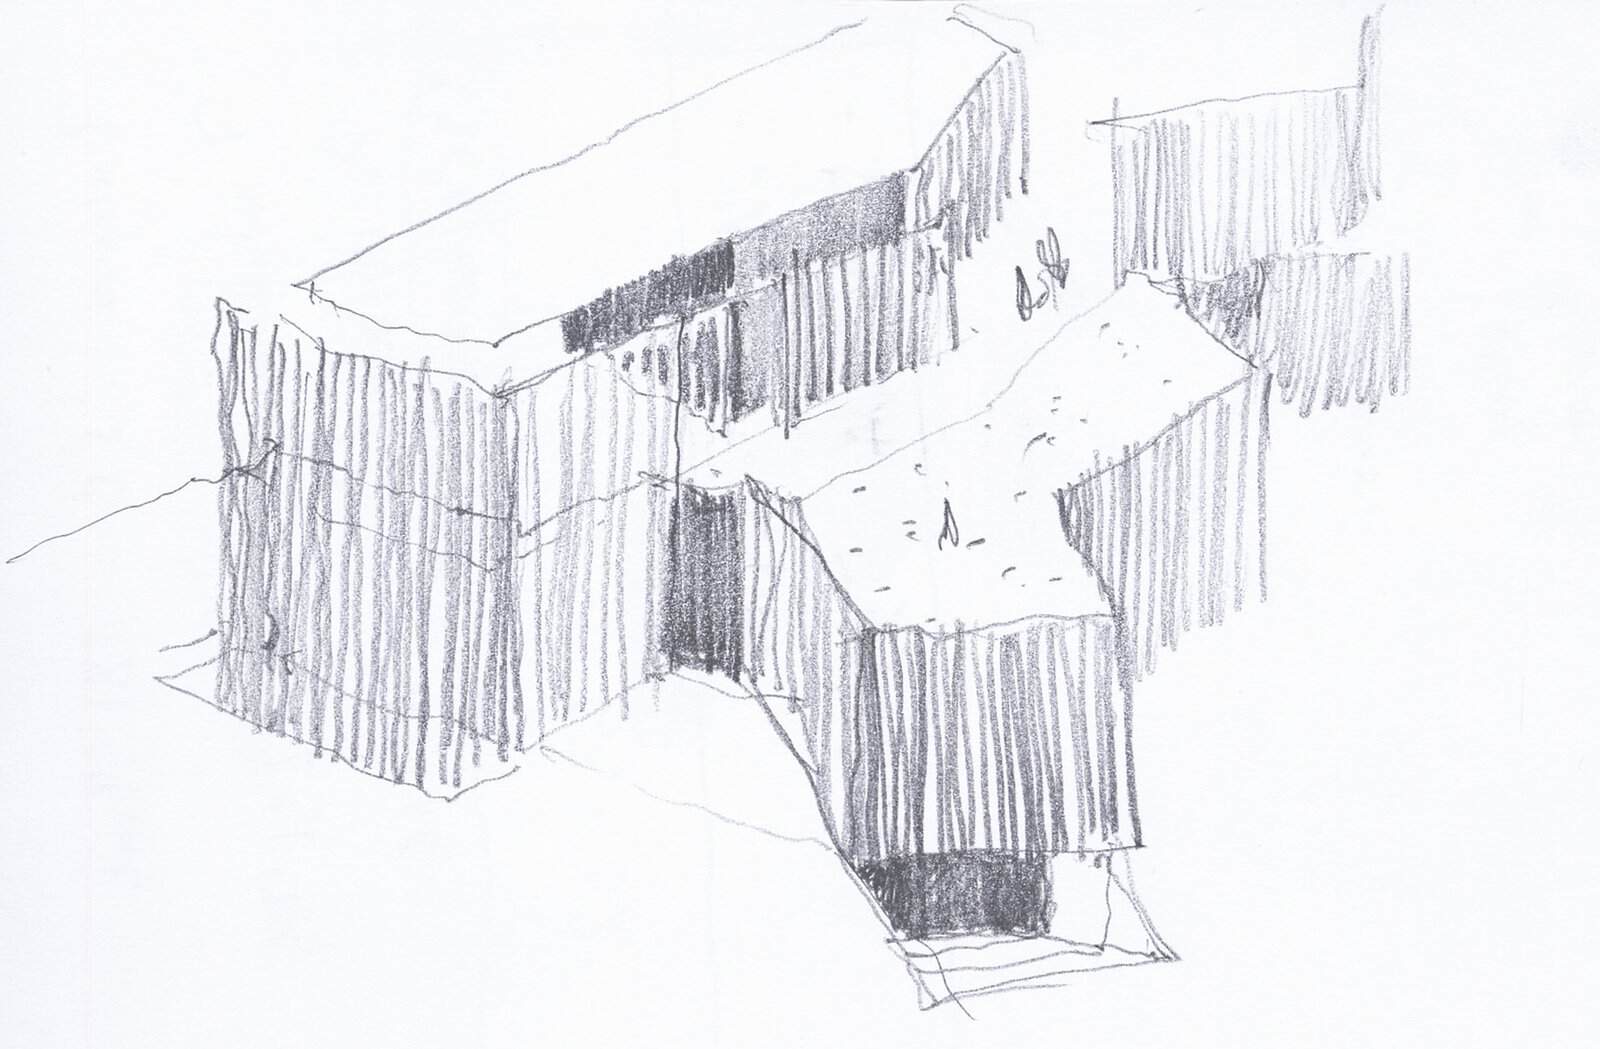
Estudio.Entresitio’s #house#1.130 in Madrid, completed in 2013, is a large single-family house of more than 500 m² on a long, narrow site sloping south. Its axonometric is a quick pencil sketch: two crossing volumes, walls built up with loose vertical hatching, and darker scribbles where the openings cut in. It reads as a thought, not a presentation, and works well next to crisp photos.
How to recreate it
- Set up the axo lightly in pencil, then go over it once with confident strokes.
- Use vertical hatching for walls and leave roofs untouched to show the light.
- Scan at 600 dpi and keep the paper texture rather than cleaning it to pure white.
9. The Structural (Tectonic) Axonometric
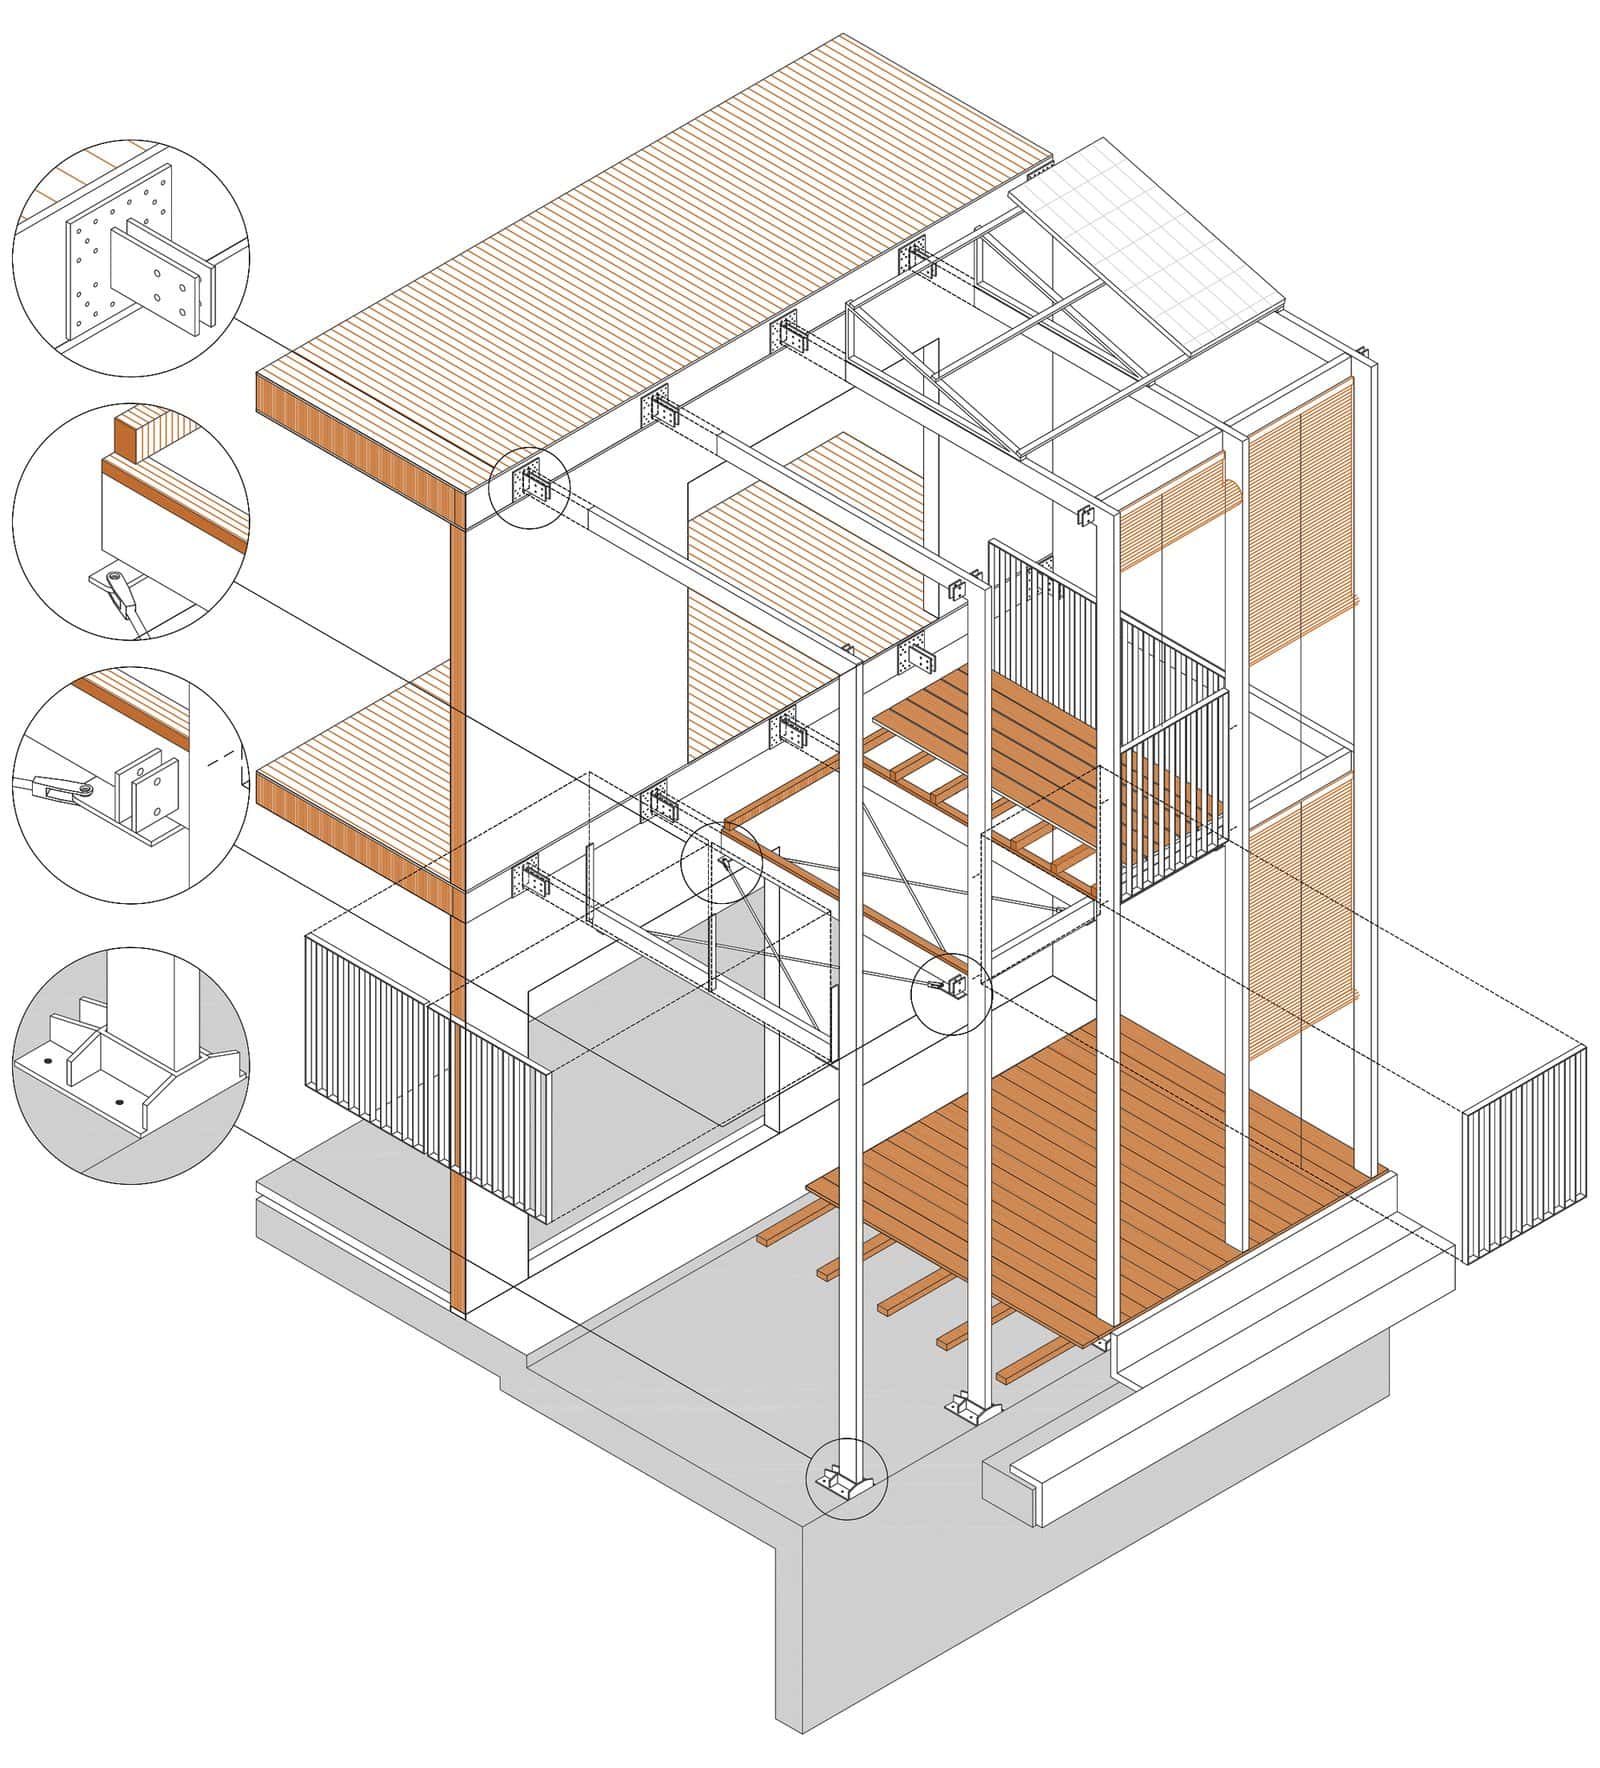
SUMO Arquitectes designed BE House, completed in 2020, for a family of four on a 370 m² plot in Argentona, half an hour from Barcelona. Their constructive axonometric strips the house back to its steel frame and timber floors, colours the timber in orange, and circles each critical connection. Those joints are blown up in round callouts down the left side, so one sheet carries both the whole frame and the bolts that hold it together.
How to recreate it
- Hide finishes and draw only the structure, with one colour for each material.
- Circle three or four key connections and enlarge them in callouts beside the drawing.
- Use dashed lines to show hidden members behind the cladding.
10. The Solid Black Concept Axonometric
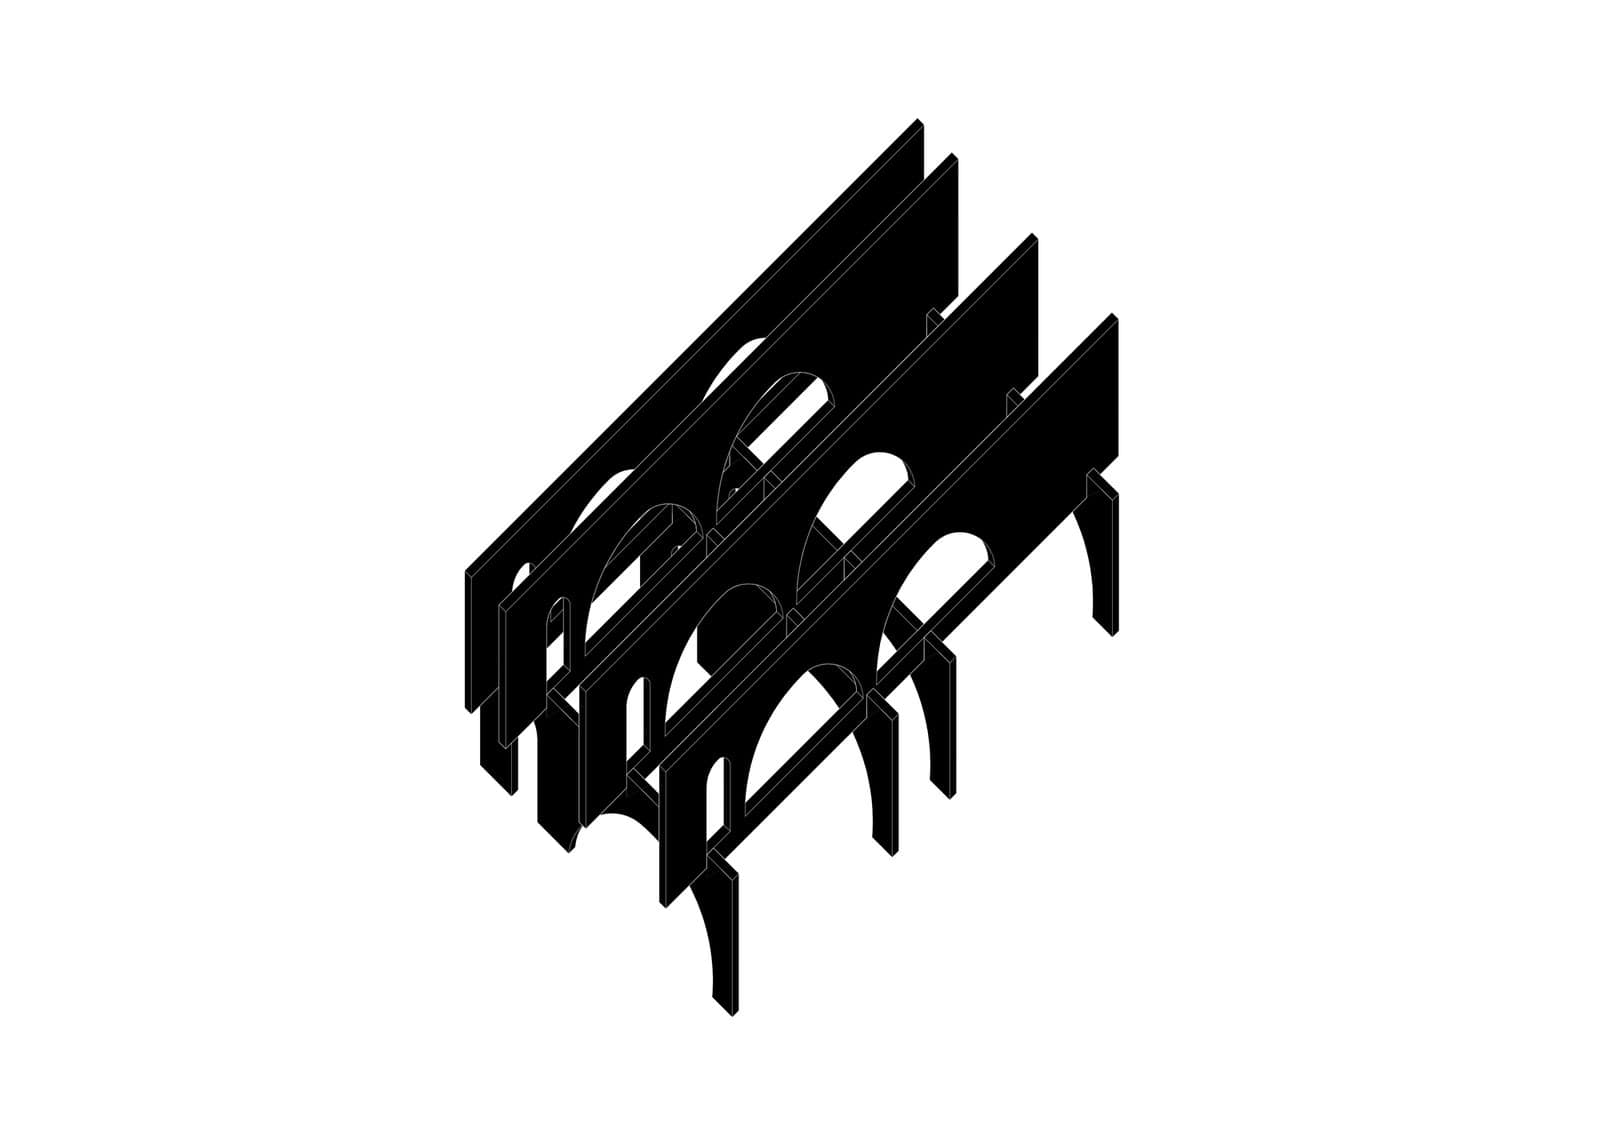
Nic Brunsdon’s North Perth House, completed in 2019, is a 195 m² infill house on a small inner-city block, organised by a simple structural arrangement to keep a tight budget under control. The concept axo shows only that idea: a run of parallel walls pierced by arches, filled in solid black with no lines, texture or context. It is the kind of drawing you can read from across the room.
How to recreate it
- Reduce the building to its one big idea, such as walls, a roof or a courtyard.
- Fill it solid black on white, with no outline and no shading.
- Put it first on the board, before the detailed drawings.
11. The Programme (Diagram) Axonometric
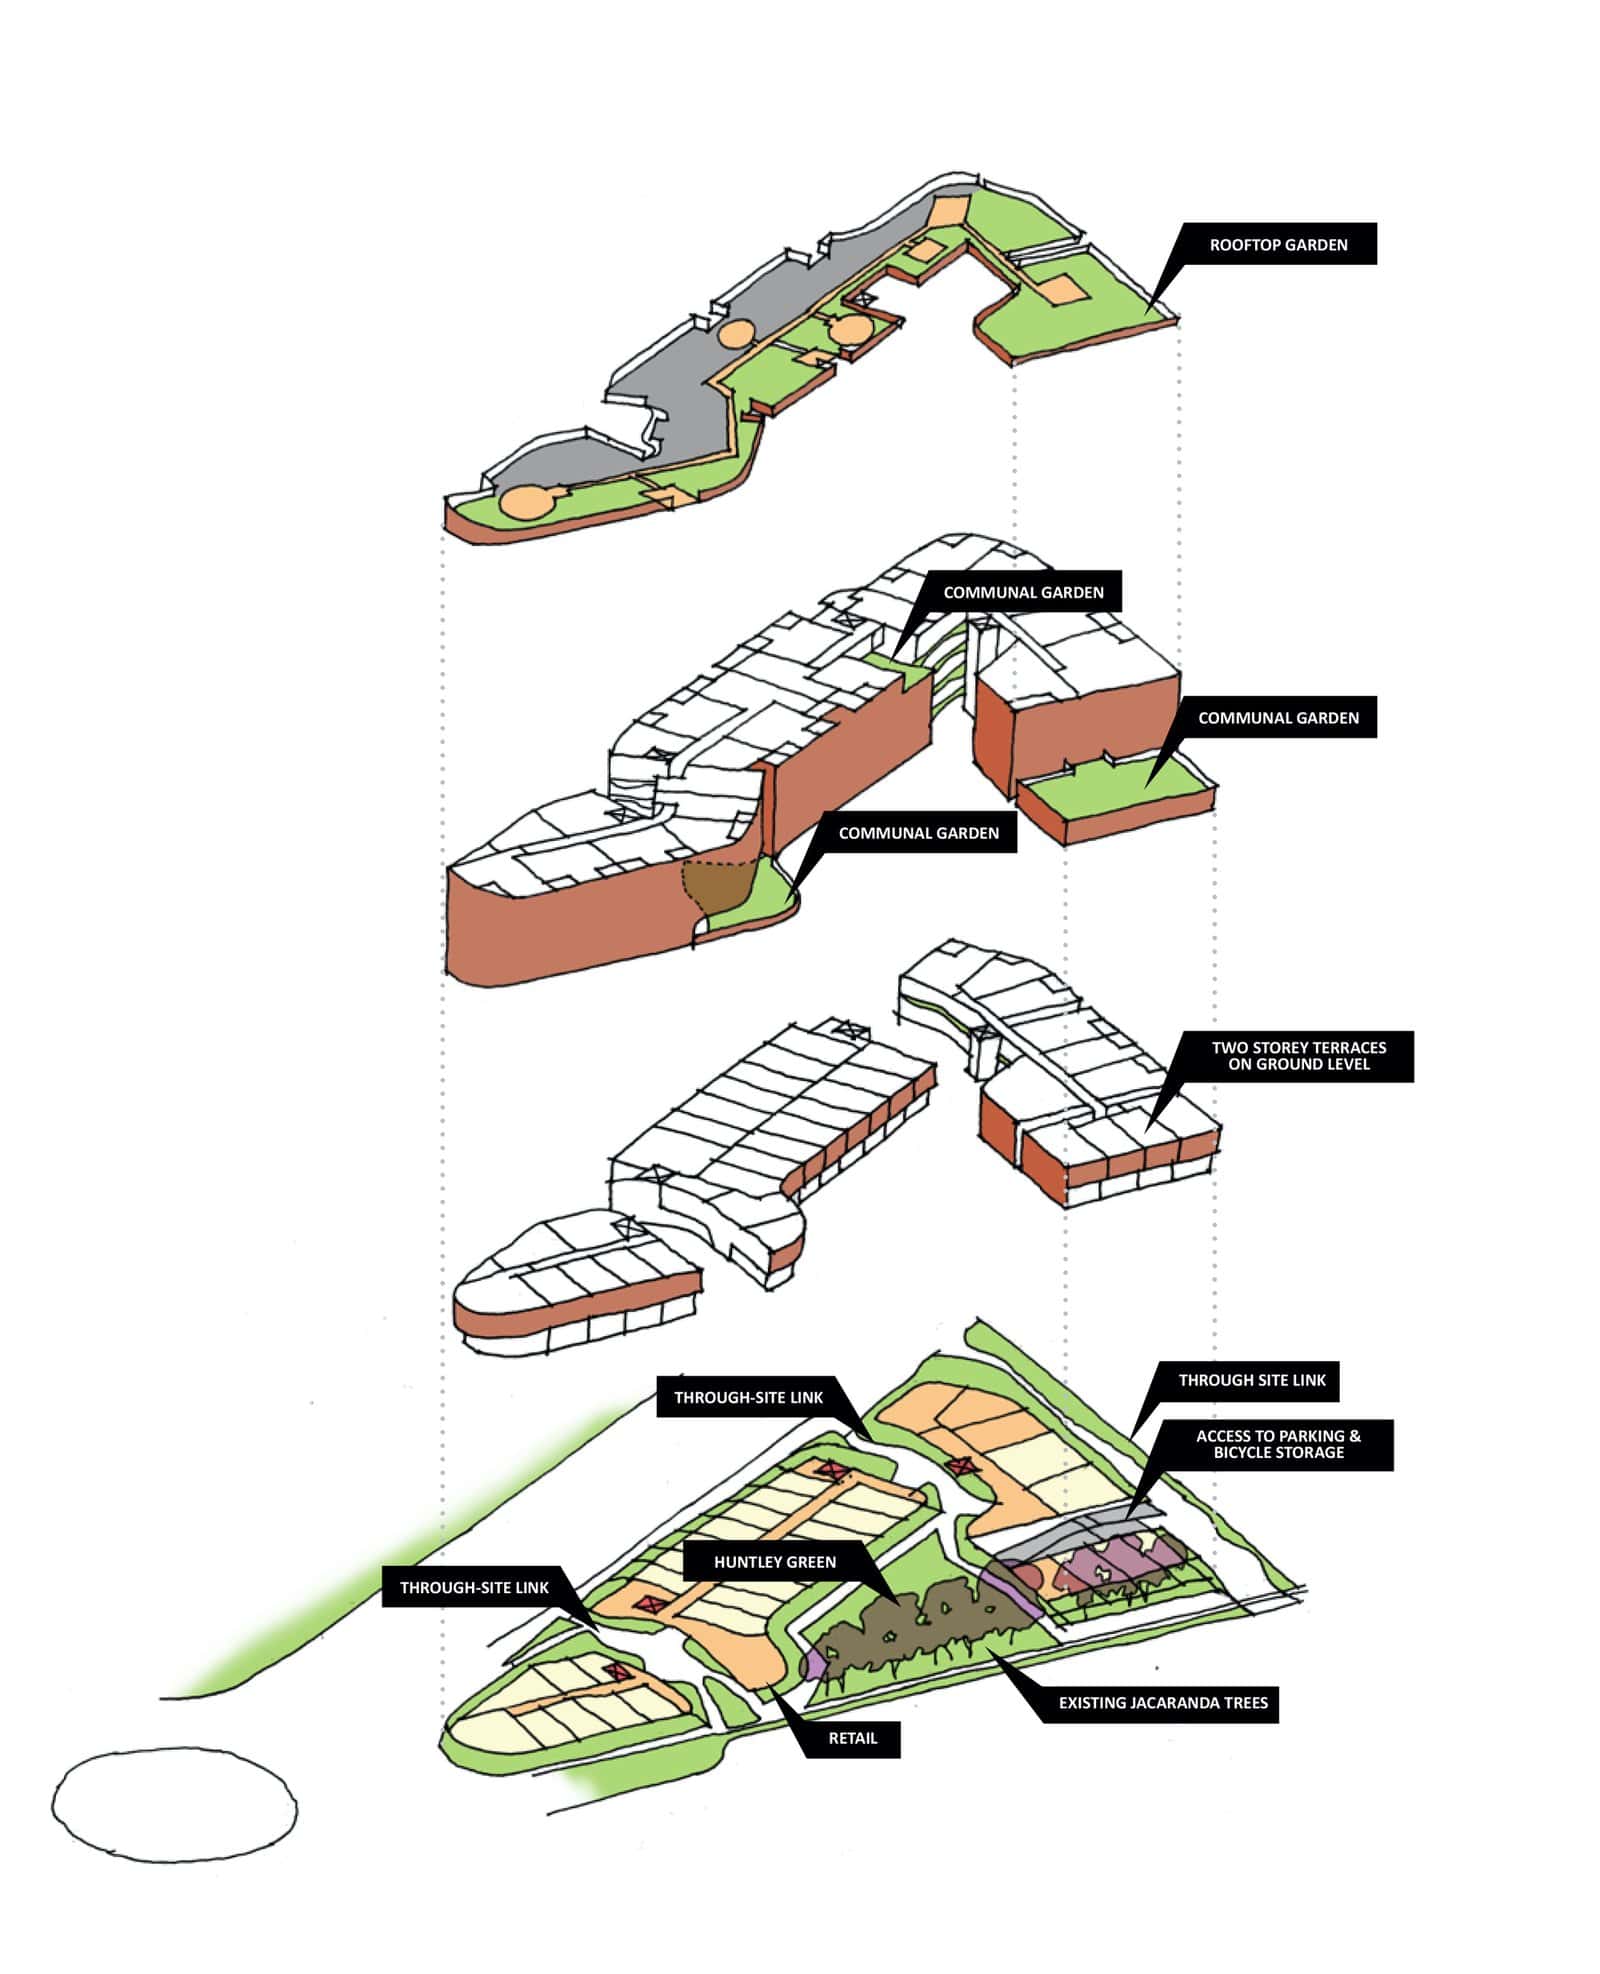
Arkadia in Alexandria, Sydney, completed in 2019 by Breathe Architecture and DKO for Defence Housing Australia, is a 5,590 m² apartment project built around shared gardens. Its programme axo is drawn by hand with markers: the site at the bottom with through-site links, Huntley Green and the existing jacaranda trees, then the two-storey terraces, the apartment floors and the rooftop garden stacked above. Black tag labels name each space, and the colour coding (green for gardens, brick red for facades) does the rest.
How to recreate it
- Explode by floor and give each programme one colour across every level.
- Label with short tags in boxes rather than a long legend.
- Keep the base layer as the site plan, with the existing trees and paths that matter.
12. The Urban (Aerial) Axonometric
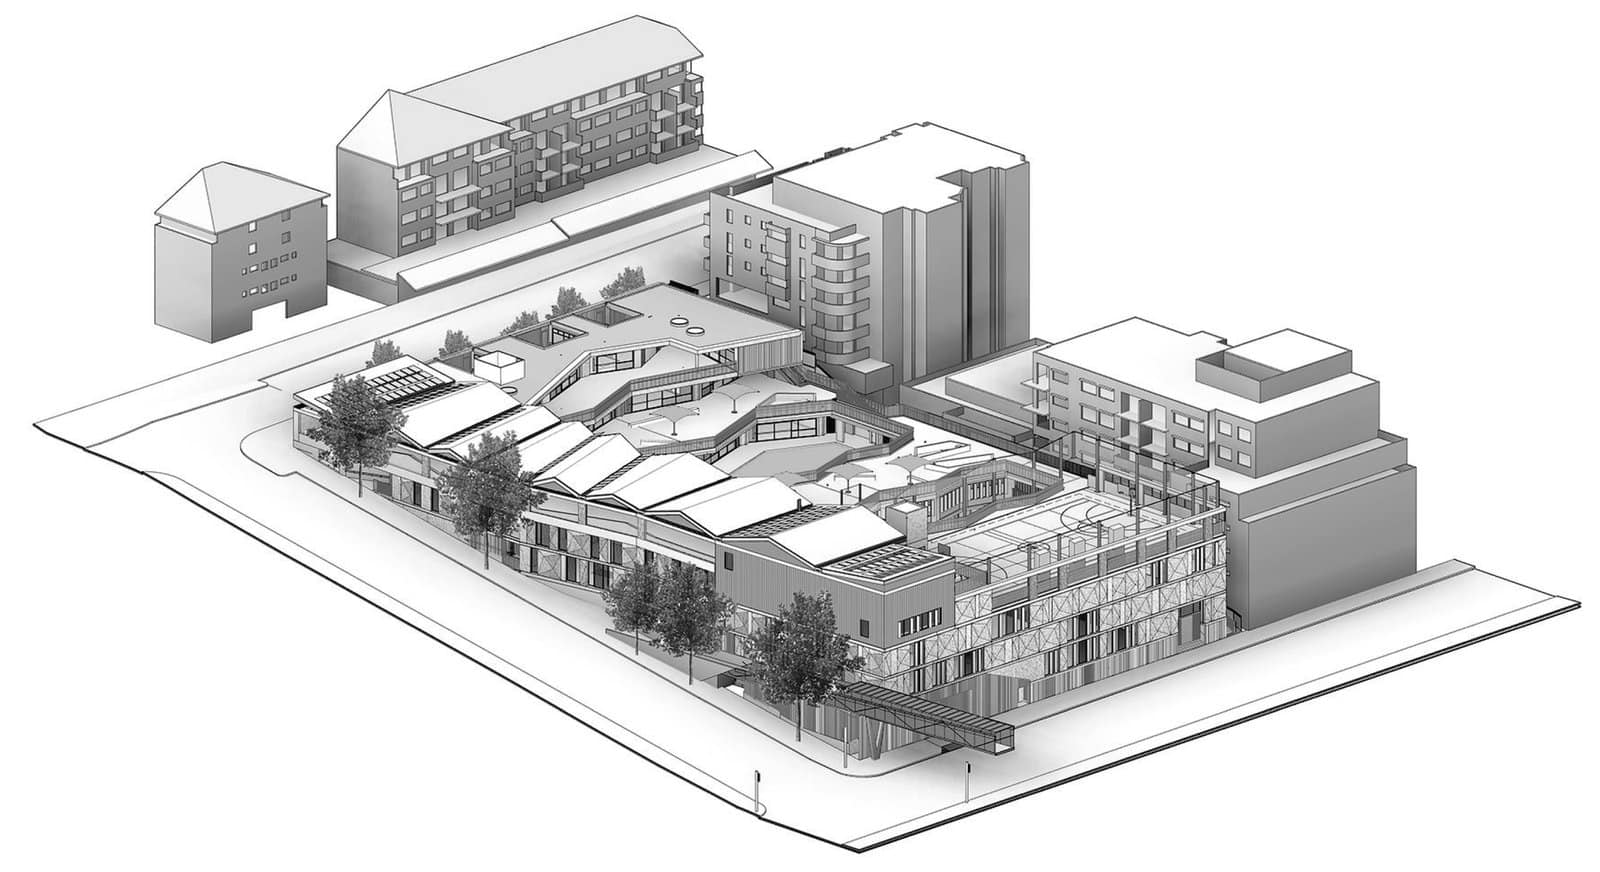
Ultimo Public School, completed in 2021 and led by Lacoste + Stevenson with DesignInc and bmc2, sets classrooms among gardens and terraces in a dense part of Sydney where most children live in apartments. The aerial axo pulls back far enough to include the surrounding blocks in plain grey massing, so the stepped, planted school reads as the one green, detailed piece of the block.
How to recreate it
- Model the neighbours as simple grey boxes with roofs and openings only.
- Give the project all the detail: planting, terraces, people.
- Show the street edge and main open space at once, and pair the view with a proper site plan.
13. The Interior Axonometric
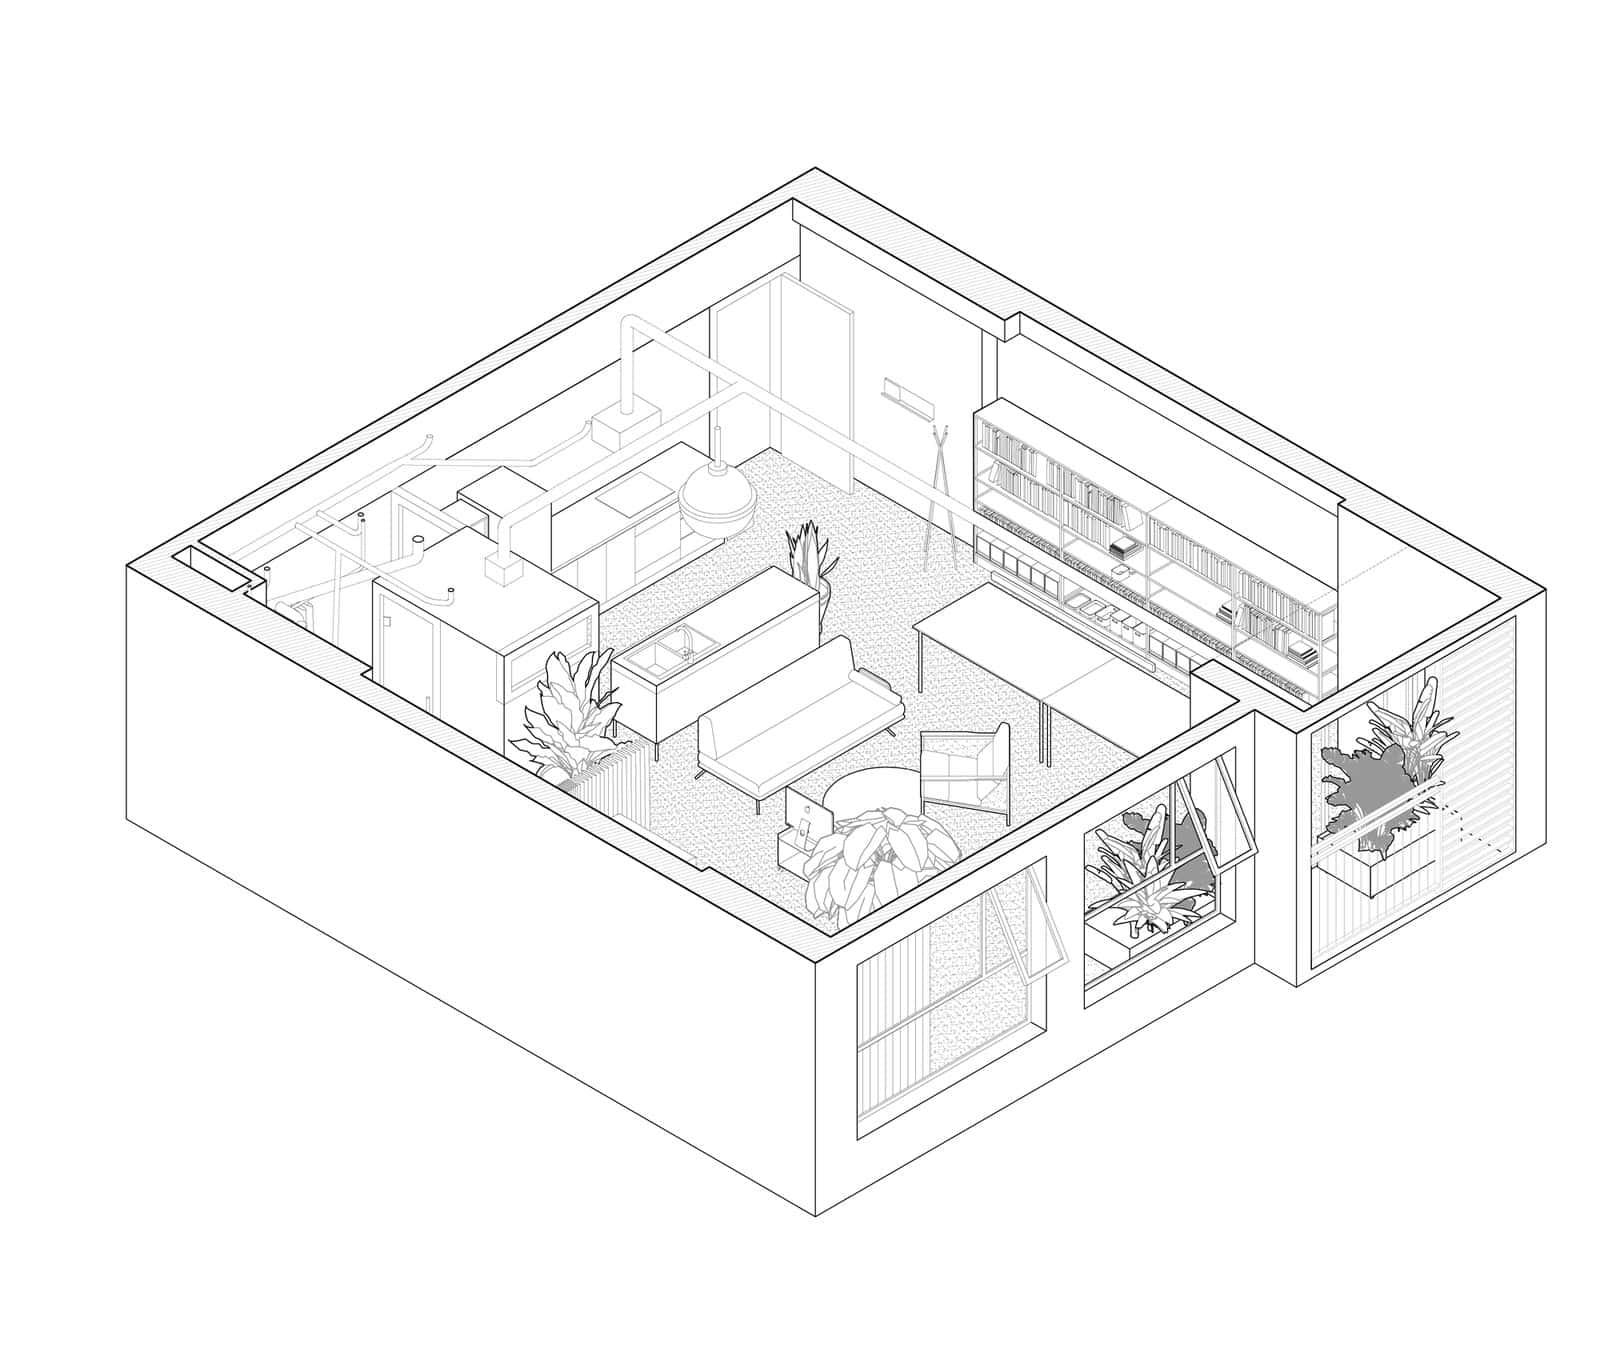
Nhabe Scholae renovated this 75 m² apartment beside the Kenh Te Canal in Ho Chi Minh City in 2018, for an owner whose possessions were mostly plants and books. The interior axo lifts the ceiling off and drops two walls, showing the open-plan studio full of sofas, bookshelves, a kitchen bench and big potted plants. It is drawn in fine black line with a light hatch on the floor.
How to recreate it
- Cut the walls at about 1.2 m so furniture and windows are both visible.
- Draw real furniture to scale; vague boxes make a room look empty.
- Add plants and a few personal objects to show how the space will be used.
14. The Model-Base Axonometric
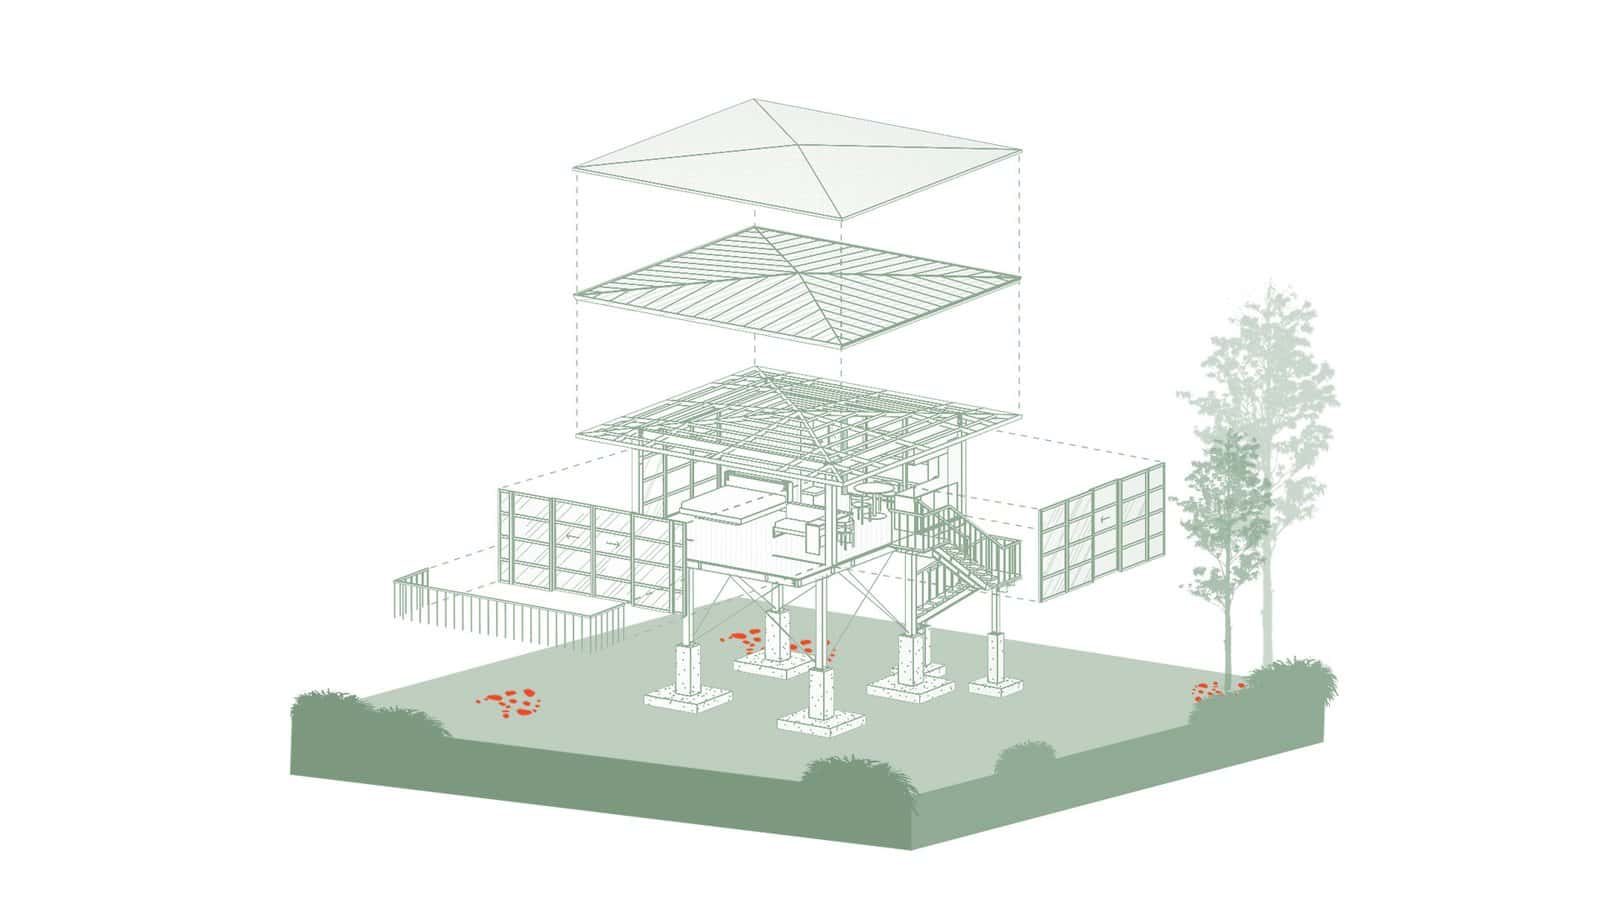
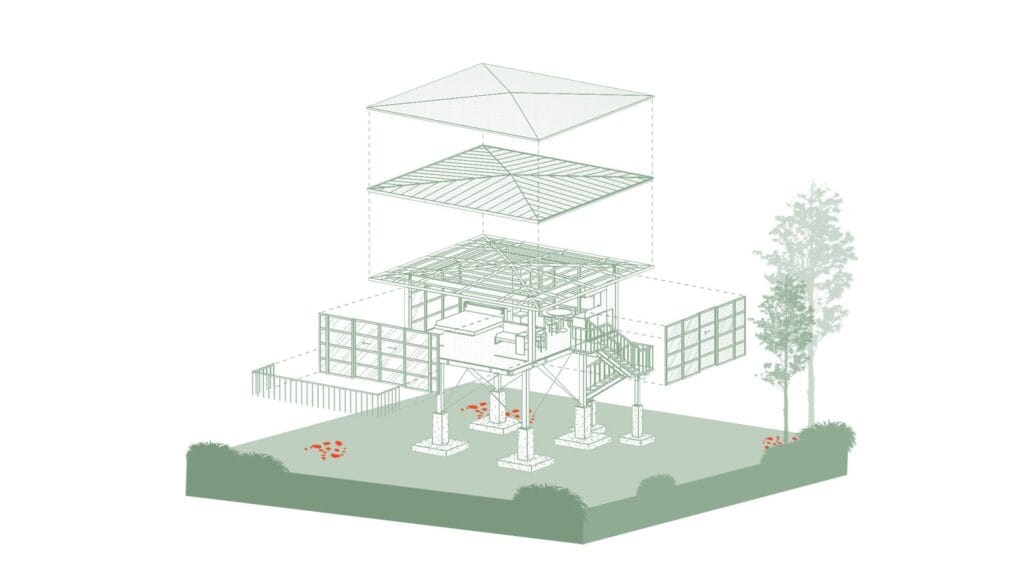
Stilt Studios’ Treehouse Studio, completed in 2022, is a 45 m² stilted retreat overlooking rice fields in Canggu, Bali. The axonometric places it on a thick sage-green slab of ground, like a site model sliced out of a board, with the roof and ceiling layers floating above. The whole drawing sits in one soft green palette, with a few red flowers as the only contrast.
How to recreate it
- Extrude the ground into a slab 1 to 2 metres deep and cut its edges clean.
- Draw the whole scene in tints of a single colour, then add one contrasting accent.
- Place shrubs along the slab edges to soften the cut.
15. The Night Axonometric
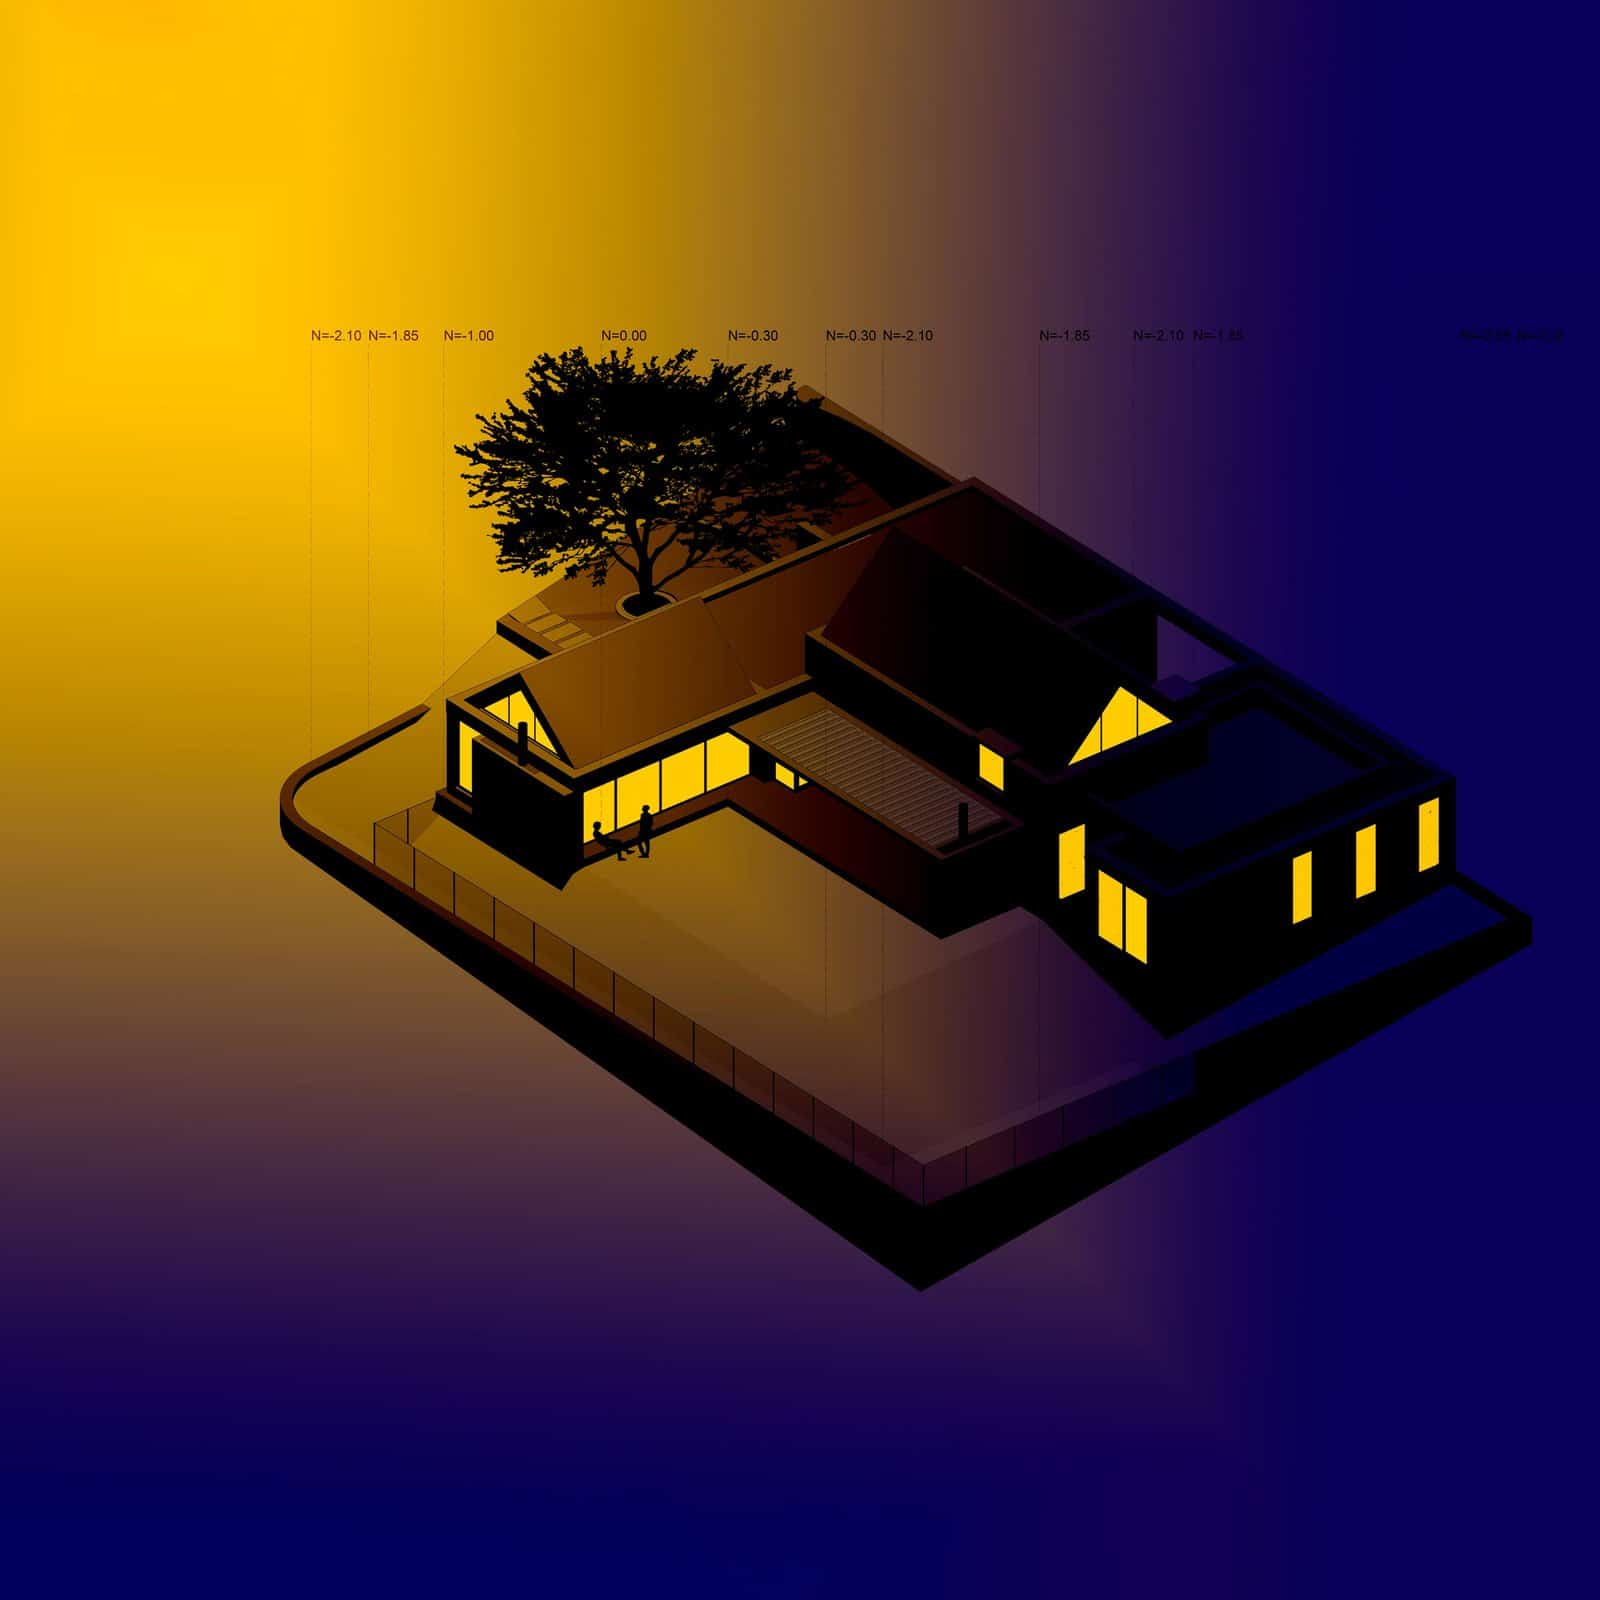
Casa PM by Feliu Vega Kennedy Arquitectura, completed in 2023, is a 399 m² house in the warm Challuabamba valley in Ecuador. Its night axonometric turns the house almost black, lets the windows glow yellow, and sets everything on a gradient that runs from gold at sunset to deep blue. A black tree silhouette and two figures in a lit doorway complete the mood, and level labels above the house keep it technical.
How to recreate it
- Render the massing in near-black and colour only the glazing.
- Use a two-colour gradient background, warm on one side and cold on the other.
- Keep one or two figures in silhouette against the lit openings.
Tips for a Stronger Axonometric Drawing
- Pick your angle early. A 30/30 isometric shows walls equally; a 45/45 plan oblique keeps the plan true and suits interiors and site drawings.
- Decide what to cut. Remove the roof, a wall or a whole corner, and fill the cut edge in black or grey so it reads instantly.
- Add people and planting. Two or three figures and a few trees give scale. Match their style to the drawing: outlines for line axos, flat colour for graphic ones.
- Keep the palette tight. One or two accent colours on a white or grey base usually beats a full render.
- Match the rest of the set. Use the same line weights, fonts and colours as your plans, sections and elevations.
FAQ
What is an axonometric drawing?
An axonometric drawing is a parallel projection of a building seen from an angle above (or below), so three faces are visible at once. Unlike a perspective, parallel lines never converge, so you can measure along each axis.
What is the difference between axonometric and isometric?
Isometric is one type of axonometric, where the three axes sit 120 degrees apart and are drawn at the same scale. Dimetric and trimetric views use unequal angles. In architecture, ‘axonometric’ often means a plan oblique, where the plan is rotated (usually 45/45 or 30/60) and the heights are projected straight up.
What angle should an axonometric drawing be?
Use 30/30 degrees for an isometric. For a plan oblique, 45/45 gives an even, symmetrical view and 30/60 favours one face. Keep vertical lines vertical in all of them.
How do you make an axonometric drawing in Revit, Rhino or SketchUp?
In Revit, the default 3D view is already orthographic, and a section box gives you cutaways. In Rhino, set the viewport projection to parallel, then use Make2D for clean linework. In SketchUp, switch on Camera > Parallel Projection, pick Camera > Standard Views > Iso, and use section planes to cut the model.
Conclusion
A good axonometric drawing explains a building in one image: how it is put together, how people use it and how it sits on its site. Start with a clean line drawing at the right angle, then borrow one idea from the examples above (a cut in solid black, a single accent colour, a few people or a night sky) and test it on your next board.

Recent Posts
Axonometric Drawing: 15 Styles and Examples
Architectural Elevation Drawing: 15 Styles and Examples
Architectural Section Drawing: 14 Styles to Inspire You